1. open a new canvas at 1024x768 :100 ppi
2. make a new layer ,grab your blend tool set the color at whatever but make sure the second color in the gradient is the same color but a darker or lighter shade
3. on the new layer with the blend tool click at the top and stop a little more than mid way down
4. make a new layer and set the blend tool mode to radial as the fg color as black and set the gradient mode to fg to alpha ,then click the <-> box next to change the gradient to reverse
5.then choose your new layer and from the middle of the canvas click and draw a line to the outer corner of the canvas ,it should look like so, turn opacity to 90.0
6.grab you text tool pick your font .set the size at 360 px
7.make a new layer, place it under the text layer and right click the text layer and merge it down
8.use your move tool set it to move layer and move it to the middle of the canvas
9. alpha to select the text layer and make a new layer under it then fill the selection on the new layer with white ,after fill the black text layer with an ice cream type of color like light pink or light blue
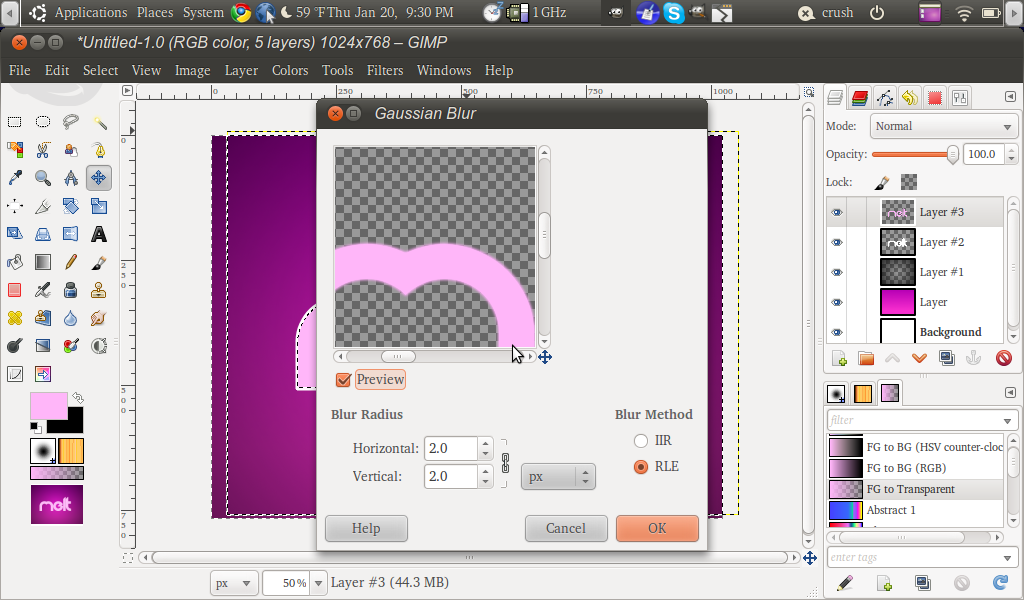
10.alpha to select the the top text layer shrink the selection by 1 px after invert the selection and Gaussian blur by 2 px
11. select none and merge down the two layers ,now click the layer and go to filters >distort>Iwarp deform radius :20 deform amount :30 do the m and the bottom of the e if your doing the word melt like me
12. next deform radius :10 deform amount :30 to do the l and the t base and small drips every where else
13. click OK ,then duplicate it ,alpha select the newly duplicated layer and fill it with black ,then with your move tool move it down and to the left to make a 3d effect
14. duplicate it again and Gaussian blur it by 35 pixels it should make a great shadow
15. make a new layer under all the text layers and shadow layer choose your square select tool ,in the tool options click the rounded corners box and radius at :100.0 px
16.make a selection like the one in the screenshot,fill with Popsicle stick brown fde387
17. make a new layer click on your bucket tool in the options set the fill type to pattern and select wood#1 pat fill and set the layer opacity at 40.0
18. duplicate the stick layer alpha to select the duplicated layer and fill with a slightly darker brown then move it down a couple pixels
19.duplicate it again fill the new stick with black and Gaussian blur by 35 PX
20. go back to the top text layer and alpha to select it .shrink by 5 px then border by 3 px
21.grab your blend tool UN tick the reverse box and make a line starting at the bottom to about halfway
22.set the layer opacity to 40.0
23.next go down to your stick layer under the pat layer with you text tool ,font size at 86 px and color red, right your stamp
24. make a square selection ,then border it by 5 px fill with red
25.then alpha to select and scale it down
26.that's all ctrl+m to merge :) f**k I'm tired enjoy
27.after you merge all your layers duplicate the finished image and set the top image mode to multiply :)


0 comments:
Post a Comment