Monday, February 21, 2011

How to make a HD icon for iPod touch with Gimp

In this tut ill teach you how to make a face-time icon :) like this one above
 1.make a new canvass at 114x114 at 360ppi
 2.create a new layer then zoom in ,and pick the rectangle select tool and in the tool options select rounded corners .radius :20.00 px

 3.make a selection like so ,make sure there no gaps between the selection and the canvas from top to bottom and side to side
 4.select your blend tool and set the colors to green :8cf670 and dark green:009400
5.with the blend tool make a downward line but stop about a inch above the bottom ,it should look something like this
 6.make a new layer and select your bucket tool tick the box that says pattern fill ,and select the pattern named warning! and fill the selection on the new layer
 7. choose the select by color tool and click the yellow part on the pattern and press ctrl+x to delete it
 8. then set the pattern layer to overlay at 35.0 opacity
 9. make a new layer ,and select your rectangle select tool and set the radius to 12.0 and make a selection like so
10.drag the dark green to the selection and that should fill it ,make a new layer
 11. with the free select tool (lasso tool) make this selection , hold ctrl to make straight lines the drag the dark green to the selection like the last step
 13. then alpha to select the layer and make a new layer on top and with your bucket tool still set on pattern ,select the pattern you want or you can use mine , get it here
14.then set the layer to overlay at 7.5 opacity

 15. next alpha to select the shapes layer and dupilcate it and and fill it with the lighter green place it under the darker fill and the move the lighter fill down a couple pixels and it should look like this
17. dupilcate it then set the image to multiply and set the opacity to 50.0 and press ctrl+m ,clipped to image and press enter to merge
 16.turn off the white layer by clicking the eye icon then press ctrl+m to merge select clipped to image
18. you must save it as Icon-FaceTime@2x.png and place it in this path in this order (these are all folders excpect for the image name and capatlization must be the way it is stated ) example name.theme>Bundles>com.apple.mobilephone>Icon-FaceTime@2x.png . thats it and this will only work if your ipod touch or iphone is 4.2 and above and jailbroken also :) hope you enjoyed this long awaited tut and stay tuned for more were back on the wagon :D

Friday, February 11, 2011

Great App for Retina Wallpapers


50,000 + Retina Wallpapers
Latest Version 1.4
Size 1.4mb
You could this App for Free in Installous
or you could support the developer 
in the App-store for a dollar.


 The Retina App is a                                                                                  awesome app that you could
 use for tutorials, manipulations, and etc. 
Ill be showing you a review of Retina.
                                                  

 So when you Go to the Retina wallpaper,
It's going to show you all the different Photos 
that this app has it would take you a long
time to look thru all of this Photo  but in 
general this a cool app to have in your iPod.


If you don't want to Look threw all of this Photos 
you can also click on the magnifying glass
by clicking that it would have all the categories
from where you can choose from.

 As you can  in the image and the right side
you can see all the Categories just scroll down look 
threw the titles and choose on the one that you 
interest in.. There is more than 20 categories that you 
could choose from. 
 All of the Photos in the Retina App are
HD really good quality...
 I took a screen shot of every of the tittle 
From the Categories so that you could see what this 
App has.

 When you choose the categories 
you're going to see and check mark.
You can see the beautiful Photo 
i think those Photo are awesome especially
because the Photos are in Hd and i love that 
now here comes that tricky part i got fooled by it
i though that i could use my finger to change to the next 
page, no you cant do that you see the 
arrows on the bottom well you got to use those to see the
the other set of images but over all it pretty easy to use
but i do tell you this, sometimes you 
will get confused and forget that you
have to use the arrows to change the page.
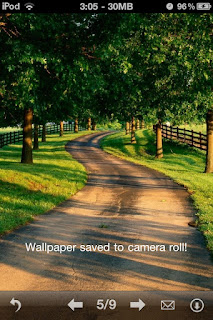
 Now when you see and Photo that 
you like and you want to keep.
You see that the arrow pointing down with a circle 
around it well you click on that icon and it would 
save that Photo for you
in you're camera roll.
You would know when it saved to you're 
camera roll, it would say wallpaper saved to 
 camera roll.
I hope that you do like this App in my opinion
i love this is from where i get my wallpapers and 
i really hope that u enjoyed this :)
please come back soon 
and we do apologize for the tardiness
Bookmark and enjoy :)